Key Components
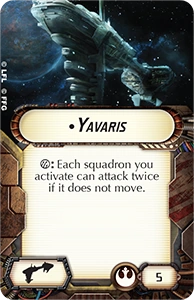
Yavaris
Are you sick of seeing Yavaris? Too bad. It's the linchpin of the build and not something Rebel squadron players are likely to give up any time soon. The movement limitation is a slight hindrance, but easily workable. The best part is it helps both with bombing and in the squadron fight. A Yavaris boosted B-Wing force is going to melt even an ISD. Ten and Dutch are going to melt and deactivate squadrons respectively.
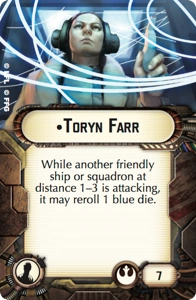
Toryn Farr
Blues in the squadron game, blues in the bombing game, so naturally Toryn is a staple. It's that simple. She affects B-Wing and Gold squadron bomber dice, just about all Rebel Ace anti-squadron dice, a good chunk of flak dice, and counter dice. Her exact location can vary, but a flotilla with the Bright Hope title is a popular choice. I almost included a Bomber Command Center as a key component, but a lot of the more recent builds have been ditching it to save the points. That, in turn, has made Toryn even more of a necessity.
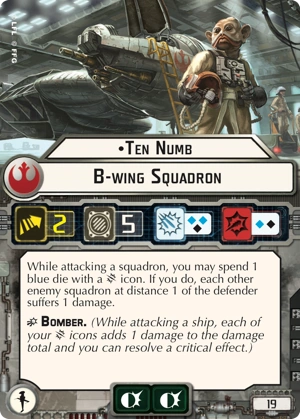
Ten Numb
There are a lot of versions of Rebel Ace wings floating around, with lots of different combinations. Some rely heavily on Jan Ors for Intel and those lovely braces she tosses around. Others use Corran Horn combined with Adar Talon to be a fast and flexible hitter. Dutch can be a major asset in dominating the squadron on squadron fight. All of these various wings, however, seem to incorporate Ten Numb. He's the gambling man's version of Mauler Mithel, capable of some truly horrific levels of damage to clustered squadrons. Add Adar Talon and especially Yavaris to that, Ten can well exceed what Mauler can do. Oh, and by the way, he's still a B-Wing. When he's done picking on squadrons, he turns his attention to using those two bomber dice of his.
Double die bombers
Be it Keyan, Gold Squadron, Dagger Squadron, B-Wings, or maybe even H-6 Scruggs, they'll be there. Just pick your flavor. Yavaris double taps are best used on large dice pools. Three B-Wings boosted by Yavaris (using a squad token) are rolling 6 blacks and 6 blues. It's where this list really makes its money. There isn't much that can stand up to that. It's more dice that any other single activation out there, especially when you add in Yavaris' own dice. Ships just melt in the face of that.
Strengths
Want to see an ISD disappear in one turn? The combined firepower of Yavaris and double die bombers is absolutely insane. Rieekan has traditionally been the commander of choice for two reasons. First, it lets a key squadron survive an alpha strike. That could be a zombie escort, like Biggs or Wedge, which forces watsed shots on a dead squadron. It could also be Ten Numb, throwing out one last round of splash damage and altering the squadron fight in a dramatic way before going down. The second use is for Yavaris, which will almost inevitably die. It is, after all, a Nebulon. Those Yavaris double taps are so critical to the build that getting even one more round out of Yavaris is worth the 30 points of Rieekan. While some truly great players have started to use Dodonna instead, it is the resilience of Rieekan that has made this the boogeyman of Rebel builds. It's won Worlds two years in a row for a reason: it's tough and it hits like a ton of bricks.
Weaknesses
Fighter Coordination Teams and All Fighters Follow Me help, but at the end of the day, the build tends to be defensive and slow. After all, the fastest double die bomber is speed 3. Ten Numb is only speed 2. If you can engage it at range from multiple angles, you stand a good chance of spreading the squadron wing out too far for them to manage. You may still need to worry about Adar Tallon shooting one squadron around like a pinball, but that's better than dealing with an entire wing of double die bombers with Yavaris double taps. Speaking of Yavaris, it will always be a weak point of the build for the simple fact that it's on a Nebulon. A quick, decisive hit at it's weak flank guts a big part of what make Rieekan Aces so nasty. You'll have to deal with one more turn of zombie Yavaris, but after that you're free of its oppressive presence.