Ground Command - Star Wars: Legion
Wednesday, December 5, 2018
Armada Meta Deep Dive: Imperial LMSU
I think everybody has used some version of this archetype, especially when Boarding Troopers/Avenger came onto the scene. Heck, my Rebel-loving ass even used it to win a Store Championship at one point. In many ways, I see it as the quintessential Imperial fleet. Star Destroyer? Check. Demolisher? Check. Direct and brutal? Check. It's no surprise that it still has legs deep into Wave 7. It has a lot of variations, but that's what's pretty cool about it. It's one of the few archetypes out there that isn't dependent on a particular commander, nor as married to the key components I list below as the other archetypes I've gone over. Heck, some of the most successful versions out there don't use Demolisher, which many Imperial players would almost consider heresy. It's a fun list that is about as Star Wars as it gets.
Monday, November 26, 2018
Armada Meta Deep Dive: Rieekan Aces
If you haven't seen this on the table, I envy your meta. You have a lot of very polite people that don't want to win at all costs. Rieekan Aces has won Worlds two years running and was runner-up the year before that. It's been used by too many players to count. I even flew a proto-version of the thing back in Wave 2. Ask Biggs how that Regionals went. It is a highly efficient build, even after multiple nerfs aimed at hitting it in the gonads. The flotilla nerf appears to have finally brought it down to earth due to the increased risk of tabling, but it's far from gone.
Key Components
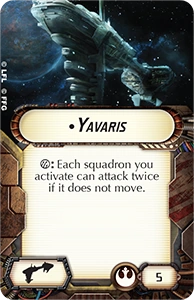
Yavaris
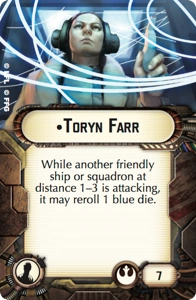
Toryn Farr
Blues in the squadron game, blues in the bombing game, so naturally Toryn is a staple. It's that simple. She affects B-Wing and Gold squadron bomber dice, just about all Rebel Ace anti-squadron dice, a good chunk of flak dice, and counter dice. Her exact location can vary, but a flotilla with the Bright Hope title is a popular choice. I almost included a Bomber Command Center as a key component, but a lot of the more recent builds have been ditching it to save the points. That, in turn, has made Toryn even more of a necessity.
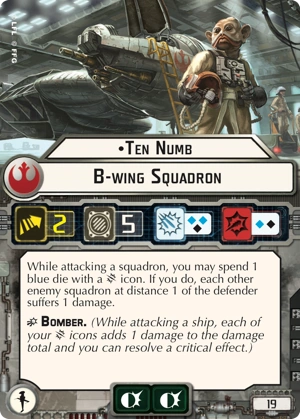
Ten Numb
There are a lot of versions of Rebel Ace wings floating around, with lots of different combinations. Some rely heavily on Jan Ors for Intel and those lovely braces she tosses around. Others use Corran Horn combined with Adar Talon to be a fast and flexible hitter. Dutch can be a major asset in dominating the squadron on squadron fight. All of these various wings, however, seem to incorporate Ten Numb. He's the gambling man's version of Mauler Mithel, capable of some truly horrific levels of damage to clustered squadrons. Add Adar Talon and especially Yavaris to that, Ten can well exceed what Mauler can do. Oh, and by the way, he's still a B-Wing. When he's done picking on squadrons, he turns his attention to using those two bomber dice of his.
Double die bombers
Be it Keyan, Gold Squadron, Dagger Squadron, B-Wings, or maybe even H-6 Scruggs, they'll be there. Just pick your flavor. Yavaris double taps are best used on large dice pools. Three B-Wings boosted by Yavaris (using a squad token) are rolling 6 blacks and 6 blues. It's where this list really makes its money. There isn't much that can stand up to that. It's more dice that any other single activation out there, especially when you add in Yavaris' own dice. Ships just melt in the face of that.
Strengths
Want to see an ISD disappear in one turn? The combined firepower of Yavaris and double die bombers is absolutely insane. Rieekan has traditionally been the commander of choice for two reasons. First, it lets a key squadron survive an alpha strike. That could be a zombie escort, like Biggs or Wedge, which forces watsed shots on a dead squadron. It could also be Ten Numb, throwing out one last round of splash damage and altering the squadron fight in a dramatic way before going down. The second use is for Yavaris, which will almost inevitably die. It is, after all, a Nebulon. Those Yavaris double taps are so critical to the build that getting even one more round out of Yavaris is worth the 30 points of Rieekan. While some truly great players have started to use Dodonna instead, it is the resilience of Rieekan that has made this the boogeyman of Rebel builds. It's won Worlds two years in a row for a reason: it's tough and it hits like a ton of bricks.
Weaknesses
Fighter Coordination Teams and All Fighters Follow Me help, but at the end of the day, the build tends to be defensive and slow. After all, the fastest double die bomber is speed 3. Ten Numb is only speed 2. If you can engage it at range from multiple angles, you stand a good chance of spreading the squadron wing out too far for them to manage. You may still need to worry about Adar Tallon shooting one squadron around like a pinball, but that's better than dealing with an entire wing of double die bombers with Yavaris double taps. Speaking of Yavaris, it will always be a weak point of the build for the simple fact that it's on a Nebulon. A quick, decisive hit at it's weak flank guts a big part of what make Rieekan Aces so nasty. You'll have to deal with one more turn of zombie Yavaris, but after that you're free of its oppressive presence.
Key Components
Yavaris
Are you sick of seeing Yavaris? Too bad. It's the linchpin of the build and not something Rebel squadron players are likely to give up any time soon. The movement limitation is a slight hindrance, but easily workable. The best part is it helps both with bombing and in the squadron fight. A Yavaris boosted B-Wing force is going to melt even an ISD. Ten and Dutch are going to melt and deactivate squadrons respectively.
Toryn Farr
Blues in the squadron game, blues in the bombing game, so naturally Toryn is a staple. It's that simple. She affects B-Wing and Gold squadron bomber dice, just about all Rebel Ace anti-squadron dice, a good chunk of flak dice, and counter dice. Her exact location can vary, but a flotilla with the Bright Hope title is a popular choice. I almost included a Bomber Command Center as a key component, but a lot of the more recent builds have been ditching it to save the points. That, in turn, has made Toryn even more of a necessity.
Ten Numb
There are a lot of versions of Rebel Ace wings floating around, with lots of different combinations. Some rely heavily on Jan Ors for Intel and those lovely braces she tosses around. Others use Corran Horn combined with Adar Talon to be a fast and flexible hitter. Dutch can be a major asset in dominating the squadron on squadron fight. All of these various wings, however, seem to incorporate Ten Numb. He's the gambling man's version of Mauler Mithel, capable of some truly horrific levels of damage to clustered squadrons. Add Adar Talon and especially Yavaris to that, Ten can well exceed what Mauler can do. Oh, and by the way, he's still a B-Wing. When he's done picking on squadrons, he turns his attention to using those two bomber dice of his.
Double die bombers
Be it Keyan, Gold Squadron, Dagger Squadron, B-Wings, or maybe even H-6 Scruggs, they'll be there. Just pick your flavor. Yavaris double taps are best used on large dice pools. Three B-Wings boosted by Yavaris (using a squad token) are rolling 6 blacks and 6 blues. It's where this list really makes its money. There isn't much that can stand up to that. It's more dice that any other single activation out there, especially when you add in Yavaris' own dice. Ships just melt in the face of that.
Strengths
Want to see an ISD disappear in one turn? The combined firepower of Yavaris and double die bombers is absolutely insane. Rieekan has traditionally been the commander of choice for two reasons. First, it lets a key squadron survive an alpha strike. That could be a zombie escort, like Biggs or Wedge, which forces watsed shots on a dead squadron. It could also be Ten Numb, throwing out one last round of splash damage and altering the squadron fight in a dramatic way before going down. The second use is for Yavaris, which will almost inevitably die. It is, after all, a Nebulon. Those Yavaris double taps are so critical to the build that getting even one more round out of Yavaris is worth the 30 points of Rieekan. While some truly great players have started to use Dodonna instead, it is the resilience of Rieekan that has made this the boogeyman of Rebel builds. It's won Worlds two years in a row for a reason: it's tough and it hits like a ton of bricks.
Weaknesses
Fighter Coordination Teams and All Fighters Follow Me help, but at the end of the day, the build tends to be defensive and slow. After all, the fastest double die bomber is speed 3. Ten Numb is only speed 2. If you can engage it at range from multiple angles, you stand a good chance of spreading the squadron wing out too far for them to manage. You may still need to worry about Adar Tallon shooting one squadron around like a pinball, but that's better than dealing with an entire wing of double die bombers with Yavaris double taps. Speaking of Yavaris, it will always be a weak point of the build for the simple fact that it's on a Nebulon. A quick, decisive hit at it's weak flank guts a big part of what make Rieekan Aces so nasty. You'll have to deal with one more turn of zombie Yavaris, but after that you're free of its oppressive presence.
Saturday, November 24, 2018
Friday, November 16, 2018
Armada Meta Deep Dive: Sloane
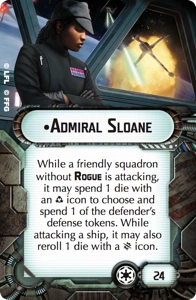
Sloane made one hell of a statement when she came out. She took home Nordic Championships and the Aussie Nationals shortly after her release. That was back before the flotillas nerfs, though, when the preferred build was an ISD and a ton of flotillas. She's been fading in the meta, but she's still strong enough and popular enough that you should expect to see her at most Regionals. What exactly that looks like though...that's open for considerable debate.
Sunday, November 11, 2018
Armada Meta Deep Dive: Raddus Liberty
Even if you've been just half reading this blog, you'll know Raddus Liberty is my baby. While I don't consider it superior to the Raddis Bomb, it certain fits me better. It has been the less popular of the Raddis builds around, but I have seen others trying it out here and there. It's picked up in usage since I won Nationals with it, so a copycat at your local Regional Championship is fairly likely.
Wednesday, October 31, 2018
Armada Meta Deep Dive: Imperial Two Ship
No, you're not reading anything wrong. It's really just two ships: an ISD and a Quasar. This build is the latest hotness sweeping Vassal.
Labels:
Governor Pryce,
Grand Admiral Thrawn,
Meta,
Regionals,
Two Ship
Tuesday, October 30, 2018
Ground Commander's Guide - 1.4 FD Laser Cannon Team
It's a new Support unit! The 1.4 FD Laser Cannon Team lets Rebels do what they already try to do with their AT-RTs - Aim and Shoot without moving like an idiot - only better because the unit in question can't move!
Monday, October 29, 2018
Armada Meta Deep Dive: Raddus Bomb
Labels:
Admiral Raddus,
Drunkle Raddus,
Meta,
Profundity,
Regionals,
Star Wars Armada
Saturday, October 27, 2018
Pre-Regionals Armada Meta Review
We're only a few weeks out from the start of Regionals season. While we're still waiting on FFG to publish a full list, your FLGS should already know if they got one. The community has been putting together a list, so head over to the forums for the latest and greatest. It also wouldn't be Regionals season if I didn't take a look at the meta and make some crazy predictions!
Labels:
Meta,
Regionals,
Star Wars Armada
Friday, October 19, 2018
NOVA Open AAR
It's been a hot minute, but I'm finally getting around to my NOVA Open AAR. Obviously the two days went quite well for me, but there's still lessons to be learned. For science!
Wednesday, October 17, 2018
Ground Commander's Guide - Scout Troopers
Scout Troopers are the Imperial equivalent of the already covered Rebel Commandos, giving them their first Special Forces unit and temporary parity with the Rebel forces. That being said, these Special Forces units differ somewhat from the Rebel Commandos and other Imperial forces. Let's take a look at them now.
Scout Troopers
Offensively is what we need to look at first. The Scout Trooper's EC-17 Hold-Out Blaster is a beast of a weapon, dropping 2 Black dice on your opponent at a limited Range 1-2. This averages to 1 hit per mini, which is better than pretty much any generic trooper mini. Unfortunately there is no offensive surge conversions to improve these shots, but with a generic 4 man team and no aim, you can average 4 hits, and increase this to 5 with a single aim token. Sharpshooter 1 helps ensure your shots will go through cover.
They aren't terrible at melee, but 1 Black die and no surges does not exactly inspire confidence. You basically cut their damage in half by getting into melee, so the Range 1-2 is their sweet spot.
Defensively, they are an Imperial glass cannon. While they are a rare Imperial unit that gets defensive surge to block, they also have the dreaded white defense die. Combined with just 4 minis per unit and a single health per mini, and if they are caught in the open they will die very rapidly. Fortunately, with Low Profile they can get Heavy Cover nearly anywhere. Also a courage value of 2 means that they can take some shots and still advance, or "Duck and Cover".
For movement, you can use Scout 1 to get a jump on an early objective, or to get them closer to the fight early, and you'll want them in the fight with their attack dice. Otherwise, just a normal Speed 2 move.
Upgrades are Heavy Weapons, Training, Comms, Equipment, and Grenades.
Scout Troopers - Strike Team
Identical to the normal Scout Troopers but only 1 mini (2 after the mandatory upgrade) and the Heavy Weapons Team keyword. The whole unit is relatively inexpensive in this case (16 points + mandatory upgrade of either 26 or 28 points)
Upgrades:
* = comes with this expansion.
Heavy Weapons
Oh my yes. Another mini (worth 15 points by itself) and the extra 13 points gives you the ability to reach across the map, a weapon with 2 Black dice (and thus no downgrade in dice quality) and the keywords High Velocity and Pierce 1. The range boost on this weapon lets the Scouts at least do something on their approach, split fire, or just sit as a Strike Team at long range and plink away at a target. They average better hits with an aim token then the Rebel's White / Black, so on a team just sitting across the map and not moving, they are going to statistically do just a bit more damage.
Pierce 1 is good enough reason to throw this onto your full team, but it might not be the most efficient upgrade.
Imperials get another way to put Suppressive attacks on a target. Sonic Charge Saboteur lets you Arm 1: Sonic Charge to put down a token capable of making an AOE attack at Range 1 with 1 Red / 1 Black and surge to crit, as well as Blast and the aforementioned Suppressive. Great against troopers and trooper spam, this can be detonated at basically any time as long as you have a unit with Detonate X: Sonic Charge still on the board, including other Scout units.
This is honestly probably the upgrade you want to take on the full scout units to maximize the chaos against trooper spam.
Training:
Duck and Cover - 8 points*
Get that suppression token early so that you can have immediate Heavy cover. With this upgrade you can walk your Scouts across the map without giving a single care about cover, or put this on a Sniper Strike Team and not worry about getting bodied from long range.
The best part of this card is that if you only get attacked once, you will be right back at the 1 suppression sweet spot next turn. No lost action, but Heavy Cover while standing in the open.
Hunter - 6 points
New card in with Fett. Attack a wounded unit, get a free Aim token. Bad news is it doesn't work on generic troopers at the moment as they all have 1 health. Should work with Wookies / Royal Guard (some of the time) though!
This can make your Strike Teams more mobile if going up against named character, it also adds more dice rerolls to your Scout Troopers while getting them all up in against the big guys, while you reenact the ending of Last Jedi on Luke Skywalker.
Comms:
HQ Uplink - 10 points*
This has some use with both Imperial commanders so far:
Vader - Use this with Scout Troopers to get that free action with New Ways to Motivate Them. (Not great when each one is worth 15 points of force on the board!)
Veers - Here's where it gets fun. Get a Recover action (which refreshes HQ Uplink immediatly!) with Imperial Discipline!
Long Range Comms - 10 points
HQ Uplink is like... right there. It comes with the unit.
Maybe better for a Vader list where your Scouts are your only non-Core units?
Comms Jammer - 15 points
Scouts do want to get ALL UP IN on your opponents anyway. This could be good for throwing a wrench into your opponent's plans.
Equipment:
Targeting Scopes - 6 points
Scouts do want to get ALL UP IN on your opponents anyway. This could be good for throwing a wrench into your opponent's plans.
Equipment:
Targeting Scopes - 6 points
Could be a very useful upgrade. Snipers don't need it, but a full team of Scouts is going to be throwing a LOT of dice at a target. Find a good way to toss an aim token their way (Veers) and go hog wild doing more damage than a team of Fleet Troopers.
Grappling Hooks - 3 points
I almost consider this worthy of stapling to the Sniper upgrade card, especially the Strike Team. Get high, see more things, shoot more things.
Environmental Gear - 3 points
Unhindered might be a big help, especially if you're planning on hiding in Light Cover / Difficult Terrain. Even more so if you're running around laying down a mine cover. Not quite an auto-include though.
Emergency Stims - 8 points*
A pretty good idea to include on your Strike Force to double your effective health for one good zombie push. Also lets you suicide yourself into an enemy if you've got a Saboteur - Arm and immediately Detonate (Arm was an action after all!) Then hang around anyway to force your opponent to use your reanimated corpses for target practice. You're already dead, might as well take some of those Rebels down with you. Stims don't kill you until the end of your NEXT activation after all.
Stims just get better the more health and potential damage / points you have available to yourself.
Grenades:
With Sharpshooter 1, Concussion Grenades aren't really all that useful. Impact Grenades could be helpful, but really you're cutting the combat power of the Scouts by taking grenades in half for each one that throws a grenade. So unless you want to an emergency source of anti-Armor, leave them at home, or put them on the Stormtrooper teams.
Waaaaaaaaggggghhhhhh! Forget bombs, you don't need anything fancy to shoot things. Get close, fire 10 Black dice at a target, survive the counter attack, and do it again. Pierce 1 ensures your attacks will cause some damage.
A pretty good idea to include on your Strike Force to double your effective health for one good zombie push. Also lets you suicide yourself into an enemy if you've got a Saboteur - Arm and immediately Detonate (Arm was an action after all!) Then hang around anyway to force your opponent to use your reanimated corpses for target practice. You're already dead, might as well take some of those Rebels down with you. Stims don't kill you until the end of your NEXT activation after all.
Stims just get better the more health and potential damage / points you have available to yourself.
Grenades:
With Sharpshooter 1, Concussion Grenades aren't really all that useful. Impact Grenades could be helpful, but really you're cutting the combat power of the Scouts by taking grenades in half for each one that throws a grenade. So unless you want to an emergency source of anti-Armor, leave them at home, or put them on the Stormtrooper teams.
Builds
Scout Troopers
- Sonic Charge Saboteur
- Duck and Cover
Total: 94 points
You've got a team that is difficult to kill, being effectively always in heavy cover, and able to drop Sonic Charges all over the place. Great against trooper spam. Get them all up ins!
Scout Troopers
- DLT-19x Sniper
- Duck and Cover
- Emergency Stims
- Emergency Stims
Total: 104 points
Waaaaaaaaggggghhhhhh! Forget bombs, you don't need anything fancy to shoot things. Get close, fire 10 Black dice at a target, survive the counter attack, and do it again. Pierce 1 ensures your attacks will cause some damage.
Scout Troopers - Strike Team
- Sonic Charge Saboteur
Total: 42 points
Kaboom! Even if your main Scout team dies, you can still set off their mines as the Strike Team hides in the rear of your lines with a detonator in hand.
Scout Troopers - Strike Team
- DLT-19x Sniper
- Grappling Hooks
- Grappling Hooks
Total: 47 points
That's pretty cheap for a good supporting unit. Better than a 4 man unit of naked Snowtroopers anyway. Hide somewhere high and put rounds downrange.
Labels:
List Building,
Scout Troopers,
Star Wars Legion,
Strategy
Sunday, October 7, 2018
The NOVA Open Format
Hey folks! Truthiness here, back after a longer than intended break following the NOVA Open. I'll dive into a true AAR of my personal experience in the near future. I wanted to start, however, by talking about the NOVA Open's unique structure for its Star Wars Armada tournament.
Friday, October 5, 2018
Ground Commander's Guide - Boba Fett - Infamous Bounty Hunter
Thursday, October 4, 2018
Let's Look At Sheev
September was not a good month for any of us here at Steel Squadron, at least not for writing articles.
Let's take a moment to look at the new Imperial Commander that will be coming out early next year. Emperor Sheev "The Senate" Palpatine is pricey for Imperial commanders, coming in at just under Darth Vader cost, making him the 3rd highest Imperial. However in exchange you get a supercharged Intel Officer for all of your ships, affecting all uses of the named token (not one specific token). But only one turn per token and one token per turn.
Let's take a moment to look at the new Imperial Commander that will be coming out early next year. Emperor Sheev "The Senate" Palpatine is pricey for Imperial commanders, coming in at just under Darth Vader cost, making him the 3rd highest Imperial. However in exchange you get a supercharged Intel Officer for all of your ships, affecting all uses of the named token (not one specific token). But only one turn per token and one token per turn.
Labels:
2019,
List Building,
Sheev,
Star Wars Armada,
Strategy
Tuesday, September 4, 2018
Battle for Darklighter Junkyard - Commandos and Han Solo Commander!
Saturday, September 1, 2018
NOVA Open Final Round.
I'm back for day two of the NOVA Open! For those unfamiliar with how NOVA does things, the cut is a little different. The top two from each day are guaranteed a spot, but the next four are pulled from a combination of the two days. This year, it just so happened to be exactly four from each day. From there, it's three rounds of swiss instead of single elimination. You're not out of it even if you lose the first round, and magnatude of win matters. So with that in mind, here are the day's first round pairings!
Scott was running Sloane with a mess of Phantoms, bombers, Maaerek and Rhymer. His dice were a bit all over the place, which is kind of party for Phantoms in my experience. I dropped in at the front of his congoline, killing Centicore and crippling the Quasar over two turns. I managed to slice the Quasar for a critical turn, letting me kill it while only allowing one meaningful squadron activation. Final was an 8-3 with a 211 MoV. Pictures from the round:
Jeremy over Alex with a 6-5 by an MoV of 9. His interdictor limped away with two health. Adam over Ron with a 7-4 (didn't see the MoV). In what looked like many a squad on squad fight with conservative capital ship action.Waiting on Jason and Mark. Mark's Yavaris is down in exchange for a bunch of Jason's A-Wings. Jason tabled Mark for an 8-3. We're taking a break for an early lunch. When we come back, it will be me against Jason, Adam against Jeremy, Ron against Alex, and Mark against Scott.
Forgot pictures for round two, but I beat Jason with an 8-3. This was the first time I've been outbid, so we played my Station Assault. I rammed his Admonition to death with the CR90s and used the Liberty and the TRC90s to trap and then kill his MC75. All the CR90s died in the process. The rest of the game was then a race for the Lib to chance down his Hammerhead for the table. I got it on the last turn and his A-Wings just barely missed killing the second station.Adam and Jeremy are still playing in what looks to be a likely 6-5. Alex tabled Ron for a 9-2. I didn't get a look at Mark and Scott before heading upstairs. Looks like it will be me against Alex at the top table in all likelihood. Adam played very conservative against Jeremy, drawing it out with minimal captial ship engagement. It ended as a 6-5 win to Adam with an MoV of just 12. Mark has killed Scott's raider and a mess of squadrons in exchange for a few of his own squadrons. Looks to be tipping decisively in Mark's favor.
The two pictures I remembered to take in round two:
Going into the final round, I'm sitting at 16, Alex at 14, Adam at 13, Jeremy and Jason at 11. Mark handedly beat Scott. Final Round pairs were myself and Alex, Mark and Adam, Jeremy and Jason, and Scott and Ron.
Round three for me was a rematch of my day one failure against Alex. Having thought about my game, I realized that the Arqs could and should be quickly removed. If she placed them on the same side of the ISD again, which has typically been her deployment, I could drop in and only take one shot from the Arqd against the Lib before killing them both. That's exactly what happened. After killing the Arqs, the Lib pulled into the side of the ISD and the combined power of TRCs and the Lib brought the big guy down by the top of turn 5. I couldn't quite chase down her Raider, but I still ended with a 9-2.
Pictures from my round three:
Pictures from around the room:
Final standings.
Scott was running Sloane with a mess of Phantoms, bombers, Maaerek and Rhymer. His dice were a bit all over the place, which is kind of party for Phantoms in my experience. I dropped in at the front of his congoline, killing Centicore and crippling the Quasar over two turns. I managed to slice the Quasar for a critical turn, letting me kill it while only allowing one meaningful squadron activation. Final was an 8-3 with a 211 MoV. Pictures from the round:
Jeremy over Alex with a 6-5 by an MoV of 9. His interdictor limped away with two health. Adam over Ron with a 7-4 (didn't see the MoV). In what looked like many a squad on squad fight with conservative capital ship action.
Forgot pictures for round two, but I beat Jason with an 8-3. This was the first time I've been outbid, so we played my Station Assault. I rammed his Admonition to death with the CR90s and used the Liberty and the TRC90s to trap and then kill his MC75. All the CR90s died in the process. The rest of the game was then a race for the Lib to chance down his Hammerhead for the table. I got it on the last turn and his A-Wings just barely missed killing the second station.
The two pictures I remembered to take in round two:
Going into the final round, I'm sitting at 16, Alex at 14, Adam at 13, Jeremy and Jason at 11. Mark handedly beat Scott. Final Round pairs were myself and Alex, Mark and Adam, Jeremy and Jason, and Scott and Ron.
Round three for me was a rematch of my day one failure against Alex. Having thought about my game, I realized that the Arqs could and should be quickly removed. If she placed them on the same side of the ISD again, which has typically been her deployment, I could drop in and only take one shot from the Arqd against the Lib before killing them both. That's exactly what happened. After killing the Arqs, the Lib pulled into the side of the ISD and the combined power of TRCs and the Lib brought the big guy down by the top of turn 5. I couldn't quite chase down her Raider, but I still ended with a 9-2.
Pictures from my round three:
Pictures from around the room:
Final standings.
Thursday, August 30, 2018
NOVA Open
Hey folks! I'm here at the NOVA Open, part of Day 1A. I'll be doing g my best to keep things up to date throughout the day. I'm running the lastest incarnation of Raddus. I won't bore you with my strategy, as I've talked about versions of this list for a while now.
Name: I'm a Leaf on the Wind
Faction: Rebel
Commander: Admiral Raddus
MC80 Star Cruiser (96)
• Strategic Adviser (4)
• Caitken and Shollan (6)
• Engine Techs (8)
• Heavy Ion Emplacements (9)
• Quad Battery Turrets (5)
= 128 Points
CR90 Corvette A (44)
• Admiral Raddus (26)
• Engine Techs (8)
• Turbolaser Reroute Circuits (7)
• Jaina's Light (2)
= 87 Points
CR90 Corvette A (44)
• Engine Techs (8)
• Turbolaser Reroute Circuits (7)
= 59 Points
CR90 Corvette A (44)
• Engine Techs (8)
• Turbolaser Reroute Circuits (7)
= 59 Points
GR-75 Medium Transports (18)
• Slicer Tools (7)
• Quantum Storm (1)
= 26 Points
GR-75 Medium Transports (18)
• Hondo Ohnaka (2)
• Slicer Tools (7)
= 27 Points
Squadrons:
= 0 Points
Total Points: 386
First round pairings up!
Pictures from round one. 8-3 win against Matt's triple Cymoon.
Round two pairings. I'm fighting against my own Sato list!
10-1 win and I forgot to take pictures in the later rounds. I got the tabling with a final engine techs ram against his MC75!
Reception is shit, so sorry for not getting the pairings up sooner.
Name: I'm a Leaf on the Wind
Faction: Rebel
Commander: Admiral Raddus
MC80 Star Cruiser (96)
• Strategic Adviser (4)
• Caitken and Shollan (6)
• Engine Techs (8)
• Heavy Ion Emplacements (9)
• Quad Battery Turrets (5)
= 128 Points
CR90 Corvette A (44)
• Admiral Raddus (26)
• Engine Techs (8)
• Turbolaser Reroute Circuits (7)
• Jaina's Light (2)
= 87 Points
CR90 Corvette A (44)
• Engine Techs (8)
• Turbolaser Reroute Circuits (7)
= 59 Points
CR90 Corvette A (44)
• Engine Techs (8)
• Turbolaser Reroute Circuits (7)
= 59 Points
GR-75 Medium Transports (18)
• Slicer Tools (7)
• Quantum Storm (1)
= 26 Points
GR-75 Medium Transports (18)
• Hondo Ohnaka (2)
• Slicer Tools (7)
= 27 Points
Squadrons:
= 0 Points
Total Points: 386
First round pairings up!
Pictures from round one. 8-3 win against Matt's triple Cymoon.
10-1 win and I forgot to take pictures in the later rounds. I got the tabling with a final engine techs ram against his MC75!
Reception is shit, so sorry for not getting the pairings up sooner.
Pictures from round three. Played against Adam Newton's Ackbar list. Unbelievably tense game. I got the table on turn six with a kamikaze ram against his assault frigates and a long range bullseye from Liberty and ram against his Jaina's Light. Super tight and extremely well played game which went 8-3 to me by a hair.
Totally forgot photos in round four. Another really tight game that came down to one damage. Lost 3-8 to duck_bird aka Alex. I had multiple shots on the ISD that were nothing but blanks and accuracies. It's been happening all day, but it cost me the game this time. 29 tourney points over 4 rounds so far!
Final round pairings
Pictures of round three against Darlye's Y-Wings. I ran him down pretty well, pulling off a 10-1 final round.
And the final standings. Alex and Adam have guaranteed slots for Saturday, and with 39, I'm highly likely to make it as well!
Final round pairings
Pictures of round three against Darlye's Y-Wings. I ran him down pretty well, pulling off a 10-1 final round.
Subscribe to:
Posts (Atom)


