
Showing posts with label Defense Objectives. Show all posts
Showing posts with label Defense Objectives. Show all posts
Friday, February 21, 2020
Monday, January 11, 2016
Using Objectives to Your Advantage - Part 2: Defensive
Last Monday we talked about the Offensive Objectives, and how play with each has changed going into wave 2. Today, we are going to go into the yellow: Defensive Objectives. Navigation is still to come, probably next week.
Wednesday, November 18, 2015
Obstacle Placement - Part 2 - Obstacle Specific Objectives
On Monday we talked about placing obstacles in Objectives without any special obstacle rules. This time we are going to talk about the three objectives that specifically change obstacle placement or rules in their use. Both Minefields and Contested Outpost change who places what obstacles and where each obstacle can go. Dangerous Territory, while it doesn't directly change the location of the obstacles, changes how they function for both the first player (worth points when overlapped once) and second player (points and no effect for rocks and debris).
In addition to these, the objective Fleet Ambush also puts some ships from the First Player deployed within a zone where obstacles could be set up. While I won't be explicitly covering this in the article, keep it in mind when setting up obstacles, both as First and Second player.
In addition to these, the objective Fleet Ambush also puts some ships from the First Player deployed within a zone where obstacles could be set up. While I won't be explicitly covering this in the article, keep it in mind when setting up obstacles, both as First and Second player.
Monday, November 2, 2015
Wave 1 Memorial Tournament - Round 4 vs MattShadowlord Game Play
Final match of the Wave 1 Vassal Memorial Tournament - I am up vs Matt Shadowlord and a chance to pull into 2nd or 3rd place with a convincing win. To review, here is his fleet:
[ MattShadowlord FLEET - 396/400]
- DESPOT Victory I-class Star Destroyer - Admiral Screed (99)
- JUSTICE Gladiator I-class Star Destroyer - Assault Concussion Missiles (63)
- ORDER Gladiator I-class Star Destroyer - Assault Concussion Missiles (63)
- PACIFICATION Gladiator I-class Star Destroyer - Assault Concussion Missiles - Insidious (66)
- AUTHORITY Gladiator I-class Star Destroyer - Engine Techs - Assault Concussion Missiles - Demolisher (81)
- TIE Fighter Squadron (8) x3 = (24)
My ships would be the so far intact original Porkins as Garm's new flagship, the Memories of Alderaan from the previous game, and the new Darklighter II. BEAST and Dinner Squadrons had been reformed.
- DESPOT Victory I-class Star Destroyer - Admiral Screed (99)
- JUSTICE Gladiator I-class Star Destroyer - Assault Concussion Missiles (63)
- ORDER Gladiator I-class Star Destroyer - Assault Concussion Missiles (63)
- PACIFICATION Gladiator I-class Star Destroyer - Assault Concussion Missiles - Insidious (66)
- AUTHORITY Gladiator I-class Star Destroyer - Engine Techs - Assault Concussion Missiles - Demolisher (81)
- TIE Fighter Squadron (8) x3 = (24)
My ships would be the so far intact original Porkins as Garm's new flagship, the Memories of Alderaan from the previous game, and the new Darklighter II. BEAST and Dinner Squadrons had been reformed.
Friday, October 30, 2015
Wave 1 Memorial Tournament - Round 4 vs MattShadowlord Initial Thoughts
Is there a sign on my back that says "Match me up against Australians?"
My round 4 opponent would be MattShadowlord, a guy I typically see on vassal, and have played once or twice casually due to both of us being available about the same time - during the week days (for me) early in the morning. Hurray for a schedule that has me working for 16 hours every Thursday, Friday, and Saturday. In this tournament he was playing Imperials, and matched evenly with me - both at 20 points. After pod play both of us were tied, with Maturin, for 5th place, giving the winner a pretty secure top 4 slot, but only if one of us actually won outright this time. First place was pretty much out though, baring JJs Juggernaut / Green Knight and Doobleg / Gowtah both going to 5-5 draws.
My round 4 opponent would be MattShadowlord, a guy I typically see on vassal, and have played once or twice casually due to both of us being available about the same time - during the week days (for me) early in the morning. Hurray for a schedule that has me working for 16 hours every Thursday, Friday, and Saturday. In this tournament he was playing Imperials, and matched evenly with me - both at 20 points. After pod play both of us were tied, with Maturin, for 5th place, giving the winner a pretty secure top 4 slot, but only if one of us actually won outright this time. First place was pretty much out though, baring JJs Juggernaut / Green Knight and Doobleg / Gowtah both going to 5-5 draws.
Monday, October 5, 2015
Wave 1 Memorial Vassal Tournament - After Action Report (Initial Thoughts)
With the FFG forums again having a vassal tournament, I knew I needed to be a part of it. Fortunately not running this one - clontroper5 was going to handle that bit - I could relax and just enjoy the games. Please note, while I am publishing this after the fact, I actually wrote this article before playing a single game of the tournament.
Monday, September 21, 2015
Tournament Points and Winning - Part II - Squadrons?
The last time we looked at Tournament Points, we discussed why maximizing your points, and going for a 10-0 win would enable you to control your destiny in a tournament. And we did so by looking at the winner of the US National's Tournament, the "GenCon Special" otherwise known as "VGGG". We also looked at what a similar list would look like from a Rebel perspective.
To keep things simple for our calculations, we ignored squadrons from the equation all together. No doubt, squadrons complicate matters. They are worth nothing on the board if your list is tabled, and a viable strategy, popularized with the "GenCon Special" is to rush in at full speed and attempt to remove all enemy ships before your own are destroyed - against which squadrons are points that are not spent ensuring you have the hull left to survive a reckless attack.
But can squadrons be worked into the equation with the tournament points, and what would list with these squadrons look like?
To keep things simple for our calculations, we ignored squadrons from the equation all together. No doubt, squadrons complicate matters. They are worth nothing on the board if your list is tabled, and a viable strategy, popularized with the "GenCon Special" is to rush in at full speed and attempt to remove all enemy ships before your own are destroyed - against which squadrons are points that are not spent ensuring you have the hull left to survive a reckless attack.
But can squadrons be worked into the equation with the tournament points, and what would list with these squadrons look like?
Sunday, September 13, 2015
Tournament Points and Winning
With the Vassal Armada tournament coming to a close, I've been considering the point system used in the tournament, and it's effect on the meta that I've seen. I've been trying to figure out the "best" strategy to build for and strategize around in a tournament - do you go for the table every time or do you play a long game? With these thoughts in mind, I crunched a few numbers, specifically tournament points and overall Margin of Victory.
Suppose you knew that with your list you could win every game, but only with a MOV sufficient for an 8-2 win. Do you bring this list to a tournament, or do you bring something more aggressive, that will likely see a 10-0 win, but doesn't guarantee you a win every time? Actually, it depends on the number of players in the tournament, and how many of them you expect will be bringing a 10-0 list. Consider - if any 10-0 players are in the game, they will be matched with one another in round 2, and both will not win. While an 8-2 list will likely be matched up against another list with a smaller victory.
For that matter, if you do decide to go the 10-0 route, how many points can you be willing to offer up to your opponent? For sake of argument, I will be using the 300pt tournament rules, as the MOV for 400pt games is not available at the time of this article.
Suppose you knew that with your list you could win every game, but only with a MOV sufficient for an 8-2 win. Do you bring this list to a tournament, or do you bring something more aggressive, that will likely see a 10-0 win, but doesn't guarantee you a win every time? Actually, it depends on the number of players in the tournament, and how many of them you expect will be bringing a 10-0 list. Consider - if any 10-0 players are in the game, they will be matched with one another in round 2, and both will not win. While an 8-2 list will likely be matched up against another list with a smaller victory.
For that matter, if you do decide to go the 10-0 route, how many points can you be willing to offer up to your opponent? For sake of argument, I will be using the 300pt tournament rules, as the MOV for 400pt games is not available at the time of this article.
Monday, May 25, 2015
Armada Objectives - Part 2/3 (Defense)
In the last installment we went over the Assault Objectives for Armada - when to choose them, and how you should construct and command your list if playing with the objective. Now we are going to go over the Defense Objectives in much the same way. Don't worry, Navigation is still to come.
Hyperspace Assault:
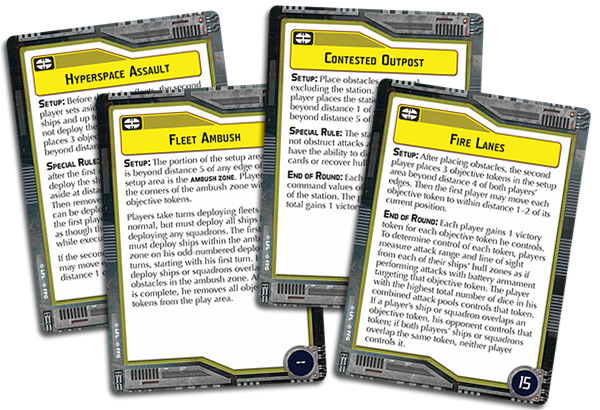
In this objective, the second player sets aside one ship and up to 3 fighter squadrons before either side begin deployment. He then puts three objective tokens down. Deployment begins as usual. Then, starting in the 2nd round, the second player may at the beginning of the round choose an objective token and deploy the ship he set aside within R1 of the token, or he can choose to move those tokens to within R1 of their position.
Second Player:
You have a ship and some squadrons that would be immensely improved by being in the rear arc of the enemy formation. You have a desire to give up a turn or two of combat for your ships and continuity of your formation to have positional advantage with one of them. You want one ship that can do an exceptional amount of damage from that position, and some good squadrons to go along for the ride. With this build, you are looking for an Alpha Strike - a sudden burst of damage that should leave at least one opponent crippled or otherwise out of the fight. But you need to also keep the opponent honest - if your entire threat is tied up in hyperspace, why wouldn't your opponent race forward and engage your weaker, already deployed group? A good option for this is a Yavaris with Raymus Antilles and a B-Wing escort.
First Player:
Your opponent is splitting their forces. This is a good thing. Your opponent will have ships that will be outflanking you. This is a bad thing. First and foremost, use your squadrons or another ship to screen the likely points that the opponent will jump in. You know when they will have to jump (beginning of the round) and where they can jump (3 objective points) so a few squadrons to keep the opponents fighters tied up should be all you really need. Attaching those squadrons to a ship with a squadron command coming up just makes it easier to send a quick response to wherever the threat comes from the turn it does show up. Remember, you get to activate first, so you can always get at least one ship out of harms way. Make sure only one ship is in the killing zone for the jump in, and you can ensure you can always get away.
Again, they split their forces. That means you can have a lot more guns, all pointed at whatever they left behind. Make them regret that.
Both Players:
Remember that the second player jumps in at the start of the round, and then the first player gets the first activation. Also that any upgrade (including Commander abilities) on the Hyperspace ship do not affect the rest of the fleet.
Fleet Ambush:
If Hyperspace Ambush split of the second players forces for positional advantage, Fleet Ambush splits up the first players forces for... no advantage at all. During deployment, all space beyond distance 5 is considered to "Ambush Zone". Both players (including the Second Player) deploy their ships first. The First Player, starting with his first ship, must deploy odd numbered ships into the ambush zone, and even numbered ships into the deployment zone.
Second Player:
I can't really think of a reason not to try and get a free round of shots of on a ship (or two) that had to deploy close to your edge of the board. You want to capitalize on your opponent being forced to split their forces, if only for a turn or two. Good for ships that can maximize their engagement distance, and can engage their opponents right from the first round of combat.
First Player:
You want ships that can stall for time, either by pointing themselves away from the battle, and looping back in, or sitting in place and tanking while your support joins the fight. Chose this objective if you are built for a brawl, and are pretty sure you'll be the one on top if it comes to it. Ships like the MC80 and Assault Frigate, that can deploy facing sideways are perfect for this objective.
Both Players:
I cannot really think of a combination of builds where both players go to this objective and didn't wind up in a tussle in the middle of the map with a lot of dice. Plan accordingly.
Contested Outpost:
The key to Contested Outpost is that you are fighting over the station obstacle token, with your total command value. This is good for builds with a lot of command value, and who can manage a brawl, because all ships will be converging on that once piece of real estate. "Each player sums the command values of his ships at distance 1 of the station. The player with the highest total gains 1 victory token." 20 points per turn you have the most Command Value at the station.
Second Player:
You have a brawling list, with lots of high command ships. This can work well for the ship heavy / squadron light builds, as squadrons really don't do anything for the victory tokens, though it can also work with Squadron Heavy if you cluster them all on top of the station. It's a good idea to have a fast ship to grab the Outpost on Turn 1, and have the rest of your fleet arrive to hold it on the following turns. You get to place the station, so use the other obstacles to your advantage to cut off potential lines toward the objective.
First Player:
Again, a brawler list with high command and a high ship to squadron ratio will help you hold the station, and a squadron heavy list can let you punish anyone who gets on top of the station. Because the second player gets to place the station, use your obstacles to limit where the station will be placed - if you put an obstacle down, the station cannot go within R1 of it. So if you see your opponent set up an obvious place with their obstacles, drop one of your own. Finally, since you know where your oppenent is going to go, and wants to be, try to outflank him on T2/T3. If you can drop one of his high value ships and shift the command advantage in your favor, the game is yours.
Both Players:
Obstacles are going to be key. Don't be so bogged down with claiming the station that you get yourself into an unsustainable position. Remember, those high command value ships you have? They are worth more than 20 points.
Fire Lanes:
This is a lot like Contested Outpost, only instead of command values, it deals with battery armament from ships. Whoever has the most on each of 3 objectives gains 15 points. This build again favors a ship heavy build, as squadrons don't add anything to the victory token gathering.
Second Player:
This objective favors a build with lots of dice - even if your ship isn't maneuverable, you know exactly where these objectives are going to be, and where your opponents will go to claim those objectives. You need to build to be able to reasonably claim 2 / 3 fire lanes every turn, giving you 30 points to 15 points or a 90 point advantage in the end game. You can set up your objective token in two different ways - clustered together or split apart. This could be built in different ways - clustering the tokens would lead to sending overwhelming firepower to that location, while splitting them up would make more sense if you believe that you could manage enough forces in all locations, or at least 2/3. A single cheap ship near an uncontested token could give you 90 points all by itself at the end of the game - worthwhile if you know your opponent cannot split his forces at all.
First Player:
It is all incumbent on the Second Player's build - do they look like they will be more likely to mass their forces, or split into groups, and do you have a good chance of dealing with that setup.
Well, that's it for this installment. I will be going over Navigation objectives next.
Subscribe to:
Posts (Atom)