
The Lists
I've had this Sato list in my back pocket for a while, but this was the first time it hit the table. I felt like I needed a break from my Raddus development, so it was a good time to break it out:
Name: Sato Jank
Faction: Rebel
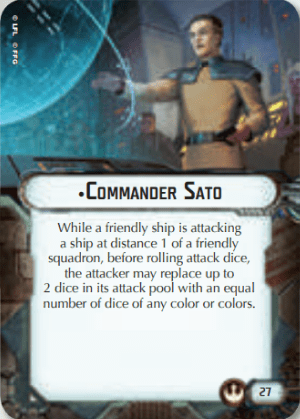
Commander: Commander Sato
Faction: Rebel
Commander: Commander Sato
Assault: Most Wanted
Defense: Fire Lanes
Navigation: Intel Sweep
Defense: Fire Lanes
Navigation: Intel Sweep
MC75 Ordnance Cruiser (100)
• Commander Sato (32)
• Bail Organa (7)
• Ordnance Experts (4)
• Electronic Countermeasures (7)
• Assault Concussion Missiles (7)
• External Racks (3)
= 160 Points
• Commander Sato (32)
• Bail Organa (7)
• Ordnance Experts (4)
• Electronic Countermeasures (7)
• Assault Concussion Missiles (7)
• External Racks (3)
= 160 Points
Hammerhead Torpedo Corvette (36)
• Ordnance Experts (4)
• Disposable Capacitors (3)
• Assault Concussion Missiles (7)
= 50 Points
• Ordnance Experts (4)
• Disposable Capacitors (3)
• Assault Concussion Missiles (7)
= 50 Points
Hammerhead Torpedo Corvette (36)
• Ordnance Experts (4)
• Disposable Capacitors (3)
• Assault Concussion Missiles (7)
= 50 Points
• Ordnance Experts (4)
• Disposable Capacitors (3)
• Assault Concussion Missiles (7)
= 50 Points
Hammerhead Torpedo Corvette (36)
• Ordnance Experts (4)
• Disposable Capacitors (3)
• Assault Concussion Missiles (7)
= 50 Points
• Ordnance Experts (4)
• Disposable Capacitors (3)
• Assault Concussion Missiles (7)
= 50 Points
GR-75 Medium Transports (18)
• Comms Net (2)
= 20 Points
• Comms Net (2)
= 20 Points
Squadrons:
• Tycho Celchu (16)
• 2 x HWK-290 (24)
• 2 x VCX-100 Freighter (30)
= 70 Points
• Tycho Celchu (16)
• 2 x HWK-290 (24)
• 2 x VCX-100 Freighter (30)
= 70 Points
Total Points: 400
Maturin deserve a lot of credit for the starting point. The squadron wing is a straight up copy from Maturin. They provide exactly what Sato needs out of a squadron wing, namely durability and mobility, while also bringing the bonus capability of major objective play. The Hammerheads and especially the MC75 were the components that I think Sato really needed to thrive. Raspoteus and Geek over at CGYSO both turned me on to the idea of the DCap Torpedo Hammerheads. You'd pay three points for a one time addition of two black dice at close range. Is three points for a one time addition of a single black die at long range really that much different? That was one of the questions going into this game. 50 points packed into the Hammerhead's frame, after all, is quite a bit. Still, three black dice from downtown with a concentrate fire command enhanced by ACMs seemed like it might be worthwhile, even if the Hammerhead died after that one shot. The MC75 is the obvious anchor to the list. It's a giant points pinata, but also packs one hell of a punch. Bail still isn't seeing a lot of use for some reason, but I can't see running a non-Raddus MC75 without him. I mainly look at him as a defensive upgrade to stop a BT Avenger from eating the ship, but it obviously works great offensively with the MC75's close range preferences.
Karneck was trying out Sloane Phantoms. Ginkapo has been raving about them leading into Euros. As you might imagine, the "King of Swiss" just won't shut up about them now. He hasn't been alone either. Sloane Phantoms have some die hard fans that only got louder after Gink's achievement at Euros. All that led to Karneck's fleet:
Name: Sloane Phantoms
Faction: Imperial
Commander: Admiral Sloane
Faction: Imperial
Commander: Admiral Sloane
Interdictor Suppression Refit (90)
• Admiral Sloane (24)
• Captain Brunson (5)
• Disposable Capacitors (3)
• Targeting Scrambler (5)
• Grav Shift Reroute (2)
• Heavy Ion Emplacements (9)
• Interdictor (3)
= 141 Points
• Admiral Sloane (24)
• Captain Brunson (5)
• Disposable Capacitors (3)
• Targeting Scrambler (5)
• Grav Shift Reroute (2)
• Heavy Ion Emplacements (9)
• Interdictor (3)
= 141 Points
Quasar Fire II (61)
• Governor Pryce (7)
• Flight Controllers (6)
• Ruthless Strategists (4)
• Boosted Comms (4)
• Pursuant (2)
= 84 Points
• Governor Pryce (7)
• Flight Controllers (6)
• Ruthless Strategists (4)
• Boosted Comms (4)
• Pursuant (2)
= 84 Points
Gozanti Cruisers (23)
• Comms Net (2)
= 25 Points
• Comms Net (2)
= 25 Points
Gozanti Cruisers (23)
• Comms Net (2)
= 25 Points
• Comms Net (2)
= 25 Points
Squadrons:
• Dengar (20)
• Whisper (20)
• Lambda Shuttle (15)
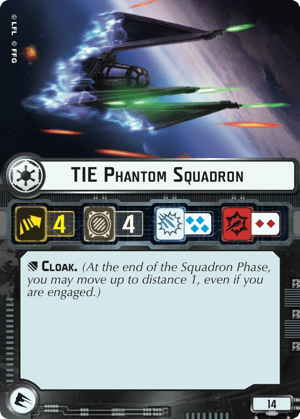
• 5 x TIE Phantom Squadron (70)
= 125 Points
• Dengar (20)
• Whisper (20)
• Lambda Shuttle (15)
• 5 x TIE Phantom Squadron (70)
= 125 Points
Total Points: 400
There's a lot of moving parts in Karneck's list here. I think his intent was to use Ruthless Strategists combined with the Phantom's cloak ability to first take damage, and then heal it via the station. I've found Whisper to essentially be unkillable around the station because of his ability, so I can certainly see this tactic working. The Phantoms themselves are, in theory, heavy hitters with Sloane. Sloane ups their chances of something useful (double hit, hit or accuracy) to 50%, while 25% (the criticals) have a chance to try again. There's still that pesky 25% of blanks, but if you can live through the swings, it's not hard to see why people might love Sloane Phantoms. The HIE Brunson Interdictor is also a certified solid choice. In this list, the Grav Shift Reroute ensured he could re-position the station to help the Phantoms, even if he didn't get to place it initially.
Deployment and Turn 1
 |
| Deployment |
I won the roll off between our two maxed out fleets and opted to go second. That presented Karneck with a pretty terrible suite of objectives. He elected to go for Intel Sweep, probably hoping to snipe my objective ship before I could gobble up enough tokens. We both chose flotillas as our objective ship. My GR-75 started at the center and planned to move toward the edge of the board along with at least one of the VCXs. He chose his far right flotilla, aiming for the objective tokens I had no plans to go for. He stood a good chance of at least pulling out a tie for the objective if he could peal off one of the tokens on my path with his Lambda. My list is not well suited for killing flotillas, so he could be reasonably confident of living through whatever my MC75 or Hammerhead could throw at it. Karneck set Pryce for turn 2, so I naturally set Bail to turn 3 to prevent the squadron last/first strike from the carrier.
Turn one was the usual jostling for position. I used my MC75 to command the VCXs and pull the Intel Sweep tokens in further. In hindsight, using a command was unnecessary since Karneck didn't quite have the range to grab any tokens with his Lambda, but I'm used to having to snatch back tokens if the first player brings strategic as well. The GR-75 gobbled up the first token and maneuvered to set up a grab in the next turn. I swung the MC75 and the Hammerhead a little wider to force the Phantoms to extend themselves from their carriers if they wanted to go for the flagship. In the squadron phase, Karneck pushed his Lambda out toward the far right token to deny me my intended third objective token. The Phantoms huddled around the station, while my HWKs used the surrounding obstacles to obstruct any shots on their fragile frames. Finally, I threw Tycho forward to start the Sato shenanigans in earnest.
Turn 2
 |
| Top of Turn 2 |
Karneck started turn two by using his left Gozanti to push Whisper into my VCXs and lock them down. Since they're heavy, he took the opportunity to fire at the GR-75, causing one damage. I elected to not spend the scatter fearing there might be more Phantom shots coming that would be luckier. His Lambda then pushed over to the far left objective token, taking it away from my GR-75's intended path. I responded with my far right Hammerhead, who had a shot on the Quasar. The DCaps and the concentrate fire command hit like a ton of bricks, producing seven raw damage, which could only be braced down to five. After that heart attack producing shot, Karneck decided Tycho really really needed to die. His Interdictor activated to send Dengar and a Phantom in to hit Tycho. Tycho lived through the shots, if barely.
Unfortunately, the Interdictor just barely missed being in Brunson range, so it wasn't able to cancel any dice. With Tycho still painting the target, the left front Hammerhead unloaded from downtown on the Interdictor with the exact same results: seven raw ACM-assisted damage braced down to five. The Force was absurdly strong with these Hammerheads. Karneck followed with his Gozanti, grabbing his first objective token. With the Relay nerf, however, Karneck had no way of influencing the squadron fight in the center, so he opted to navigate. He was reluctant to go into close range of the MC75, so opted to slow down and wait until the next turn to maneuver for the objective token.
With Tycho still in place, it was the MC75's turn to take some shots from downtown. Guess what? Once again I threw out seven natural damage with ACMs, this time with a double hit on the red and a hit and a hit/crit on the blacks. Karneck considered discarding the brace, but elected to keep it for another turn. That brought the Interdictor down to 4 hull and no shields on the front or sides! This was still turn two! I maneuvered the MC75 nice and close to the Interdictor and the Quasar for what I hoped would be the kill shots on both ships at the top of the next turn. Since Pryce was holding the Quasar back, I followed up the MC75 with my final Hammerhead, which had no shots to speak of, and the GR-75, who gobbled up a token and commanded the HWKs. I threw one HWK over toward the Lambda to stop it from further moving the far left objective token and tried to use the other to free up the VCXs.
Karneck finished out the turn with the Pryce Quasar. He finished off Tycho and started throwing shots at the front left Hammerhead. Unfortunately his dice were no where near as hot as mine. He managed just two damage on the front of the Hammerhead and forced a discard of the redirect token. The Quasar jumped up to speed three, but there was no avoiding the MC75. In the squad phase, Karneck pushed up another Phantom out of range of my HWK to keep the VCXs pinned down. They caused a couple points of damage in return, but nothing particularly significant. He then used cloak to hop back to the station with most of the Phantoms that needed healing, invalidating all but one point of damage I had caused to that point.
Turn 3
 |
| Top of Turn 3 |
There was no helping what came next. It was time for Bail, and man did he shine in this game. I didn't have any Sato help available as I had left my squadrons stranded just outside of command range (and therefore wasted the cued up squadron command). Still, the MC75 had the perfect shot lined up, unloading on the Interdictor to the front and the Quasar to the side. Even after Targeting Scramblers, it rolled an accuracy, three hits, and a hit/crit, killing the Interdictor outright with some room to spare. That left External Racks available for the Quasar, as I hoped. Again, I got exactly what I needed: five hits and two hit/crits, killing the Quasar even through its brace.
 |
| The MC75's shot at the top of turn 3 |
We called the game there, the final tally at 475-16. Karneck potentially could have killed a Hammerhead and/or some of my squadrons, but for a casual game like this, there was no need to go through the motions. The game would end at the conclusion of the turn regardless. I had two objective tokens to his one with no chance for him to grab another. Meanwhile, he would only be able to command two squadrons before my ships starting scattering away from his squadron ball. Sato had carried the day in a major way.
Conclusions
Every time I see Sato on the board, I'm always amazed at how much pain he can bring to bear from long range. This was no different. The Hammerheads threw out a jaw dropping amount of damage at long range. The DCaps were absolutely the right call, increasing the odds of the much-needed ACM trigger. For a ship that is likely to crumble after one shot, it's worth the three points to make that shot 33% more effective. Of course, it helped that my dice were rather ludicrously hot. I'd love to see the odds on those second turn shots, because all three shots managing to roll seven damage on three dice is just nuts.
I'm a bit in love with how differently Sato allows you to approach the squadron game. He just doesn't care about winning the squadron war. He doesn't care about bombing. I just need to paint targets and survive. If I get a shot at killing another squadron, great. If not, I don't care. Your opponent is also forced to care about squadrons they would probably normally ignore. I especially like the objective-centric approach Maturin pioneered. Tycho is your opener that is more or less expected to die. Meanwhile, your VCXs gobble up objective tokens and/or catch up with Tycho to paint targets while also providing eight hull points of durability each. The HWKs, meanwhile, make sure you can move those VCXs wherever you want. If your opponent manages to make that difficult? Just use the HWK itself to paint targets since it cannot be stopped. It's the first truly solid medium squadron wing I've ever seen, and it works almost entirely because of the threat of Sato. If you're looking for a truly different way to play the game, Sato is your guy.
It cannot be overstated how much the flotilla nerf has helped Sato. Arguably his best use is producing long range black critical effects, like seen here. However, those same builds have a horrible time producing accuracies, and therefore killing flotillas. Before the nerf, I would have had to hunt down those two flotillas while getting pecked away by relayed Phantoms. Instead, I was able to concentrate entirely on the large ships and bring them down for a quick tabling. The Achilles Heel of this Sato list, however, is MSU, and, more specifically, evades. That's nothing new for Sato players though. The difference now is you see a lot less MSU. That's partially left over from pre-nerf flotilla spam taking away activation advantage and driving MSU toward extinction in wave six and early wave seven. We Armada players are rather slow to adapt, so there have been few players moving back to test MSU style lists as of now. The other culprit is the Cymoon. There's nothing quite like having your small ship one-shot from downtown to turn you off of CR90s and Hammerheads. So all of that said, in a meta with lots of large ships, Sato could be king. At the very least, he's the king of jank.
As for Sloane Phantoms, neither Karneck nor I were particularly impressed. There was a lot that could have changed this for him, though. For one, his dice were mediocre at best. I don't have a high tolerance for swingy dice, so Sloane Phantoms are a test for my patience. The potential is certainly there, though. There were also some small things that could have changed the game in a major way. Brunson coming up just short of the station is the biggest one. Karneck should have been able to cancel three hit/crits while he was taking fire thanks to the Interdictor title and Brunson; one from the Hammerhead on turn two (it still would have tiggered ACMs regardless), and two from the MC75 on turn two and three. That millimeter cost him a whopping nine damage: four from ACM triggers, four from two un-braced hit/crits, and one from a braced hit/crit. At the end of the game we both just went "yuck, Phantoms," but as I've typed this out, I think his list deserves another chance. It has the potentially to be quite tanky in both the squadron fight and the ship to ship fight. Had the Interdictor been able to drag out the fight for another turn or two, I think the Phantoms would have started to eat me up. I'm fairly confident I still would have pulled it out, but it would have been a far closer affair.
Truthiness, you are a hero for going through all the hustle in order to get the hype out. Definitely going to give that a try, after I get my hand on three DCaps...
ReplyDeleteIf you have enough Hammerheads, you should have enough DCaps. I'm pretty sure there were two in each Hammerhead set.
DeleteCrap, nope. Hmmm, now I'm wondering if *I* have enough DCaps to run this on the table.
DeleteSo you are saying you do NOT have 3 Quasars in your shelf? I'm hoping to find a retailer who sells single cards for this one.
DeleteThe Quasar DOES have two, I confirmed that. I also found an eBay seller (evylgamingempire) that has them for $0.99
DeleteGreat news! Thanks for the update!
DeleteMaturin here, Truthiness. Thanks for the shout out - and I’m supremely happy to see you make this Sato list work. I might have to borrow it when I return from travelling this summer...
ReplyDeleteI'm still in shock at just how much fun it was to fly. It's the first truly new playstyle I've experienced in a while. Glad I finally got it on the table.
Delete