

This one is for Yub Nub, who pointed out that we are woefully deficient on our Corellian Conflict guides. It's been a while since we talked Corellian Conflict around here, though not for lack of enthusiasm. I'm of the opinion that this is the absolute best way to play the game, and I don't think Biggs or Shmitty would disagree with that. I think we all got so deep into campaigns that we forgot to talk about them. I'm currently on my third (which I really should do a write up for...). I've played as Empire once and my current campaign is my second as Rebels. I'm going to do my best to go deeper into CC over the next month. I'll start with Yub Nub's requested topic: Show of Force.
I would be lying if I said the special resource missions were perfectly balanced; they're really not. The Imps definitely have it easier. But that's ok. The Rebels have other advantages in the campaign and the slight discrepancy forces the Rebels into an asymmetric style that suits their background. But we're not here to talk about the relative balance of the scenarios. We're here to talk about the objective itself.
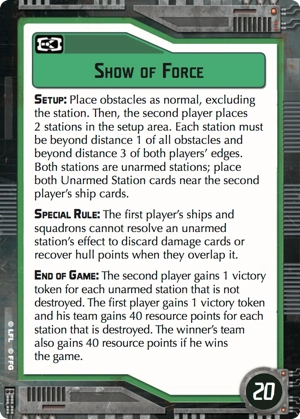
From the Imperial perspective, this is a pretty straight forward affair. The priority for you is the stations. Do 20 hull damage to the stations, get 80 resource points. Because that is so easily accomplished, winning the game is honestly secondary. Even in a loss, your team gets 40 more resources than the Rebels. This is more about minimizing losses than anything else. Straight up winning is a little more difficult since a good Rebel player will force you to choose between shooting the stations and shooting enemy ships for those critical engagement turns (3-5), still this isn't an impossible obstacle to overcome.
The key to this scenario is setup. You want to force the stations to be as close together as possible. This ensures you don't have to split your force to go station hunting. As the Imperial player, you will get to place two obstacles. These should always go in the same place. Your goal is to keep the stations out of the corner. You can do that by placing the biggest obstacle available just a hair over distance 2 at a 45 degree angle in from the corner of the Table Deployment Zone. Because the station has to beyond distance 1 of other obstacles, beyond distance 3 of the long edge, and beyond distance 5 of the short edge, this obstacle placement shuts down a huge chunk of the board. This is what that looks like on the board:

By doing this to both corner, you force the stations toward the center of the table. The furthest apart the Rebel player should be able to place the stations is a little over 2 ruler lengths. It looks like this:

If you have an Interdictor (it's CC, why don't you have an Interdictor?), this gets even more crazy. Bring that lovely Grav Shift Reroute and yank one station a further distance 2 closer to the other.
This is also a scenario perfectly suited to hit and run tactics if you're down points in the overall campaign. Take whatever fleet has Demolisher (You don't have it? What?!) You can send Demolisher to pretty reliably kill the stations on a suicide run. So long as you keep everything else uncommitted and hyperspace out the second the stations are dead your refit points will cover the Gladiator and you've netted your team 80 resource points. Yes, you've given the Rebs 40 resources, but if you're down in the campaign, they're probably near maximum points anyways. You also don't give up a victory point since the special resource objectives don't award any victory points.
Yikes that's a lot of inherent advantages for Imperials. So what's a Rebel to do? The same thing you do when slipping on ice: steer into the skid. Your goal isn't so much to protect the stations as forcing a terrible trade off. Timing is the tricky part. You have to force Imperials to choose between shooting your ships and the stations. This can be hard to accomplish, but the best way I've found is a hard flanking maneuver. With so many advantages in station placement in the Imperial corner, I don't think there's much point in separating the stations. Instead, I prefer to set them pretty much right next to each other off to one side of the table. You then set your fleet in a position to flank any Imperial attack that goes straight for the stations.
Since the Imperial player is likely to prioritize the stations, your goal is to kill enough to make it a wash in resources. That means you need to end the game killing at least 170 points more than the Imperial player. Why 170? Most campaigns seem to start with three repair yards for each side, meaning they have 45 refit points. To force the Imperial player to Max out their refit points, you need to kill 90 points, not including upgrades. You then need to even out the 40 resource points, so that's a further 80 points without upgrades. It's easier said than done, but you have to force the Imperial to choose between engaging your fleet or going for resources. You can't let them do both.
Here's an example of what that hard flanking movement looks like over the first three turns (imagine the CR90 as a Hammerhead):
 |
| Deployment |
 |
| Top of turn 2 |
 |
| Top of turn 3 |
I wish I had better advise than simple math justification, but keep in mind you have to think strategically, not just tactically in CC. Logistics are key, and resource points are this game's logistics. A resource run doesn't do anything for the Imperials if they don't even make up for their losses.
That's all for now. See you next time for the Rebel Special Assault: Hyperlane Raid!
Although the objectives themselves are weighted toward the imperials, I've grown to become ok with that because the strategic advantages to using them lie with the rebels.
ReplyDeleteThey're perfect for taking territory with crap objectives as it's the only way as an attacker that you choose the objective. Thus a tailored fleet can secure a large advantage.
That being said, the rebels must declare in the core, while imperials must declare outside it. Frankly the rebels benefit more because the empire holds less territory in end game and will usually prioritise the good spots in the core meaning a rebel loss in the outlying territory only yields the resources.
Whereas an imperial loss in the core likely yields the resources, an outpost or base that basically paid for itself and then some, on a location with a particularly nasty defensive objective upon which you can hang your hat for some uncontested points or crush an ill prepared imperial attacker, again with low likelihood of base building since they have to be extremely choosy. Great way to secure an early comms net or diplomats.
My approach as the Imperials was to offer the Rebels a deal: Let me destroy the stations and I'd retreat, allowing them to win the match. Everyone gets resources, no one has to get their ships blown up. In fact, if the Rebels wanted to just blow up the stations themselves, they'd have a chance to evacuate everyone first and I wouldn't even need to enter the system. My opponent seriously considered accepting, and even admitted that it would probably be the best choice for everyone, but we ended up fighting it out instead.
ReplyDelete