
I’m still in a bit of shock, but I actually took the Dumpster Fire to GenCon and won the 2019 Armada North American Championship!
Since then I have received a ton of congratulations from the Armada community for which I am very grateful. I have also been getting more than a few people asking What? How? Why? Garm? WTF?
So, this post is going to cover the “Why?” of the fleet. Every piece of it is there for a reason and has a job to do. The fleet has been described as finely tuned by my opponents and I wanted to give you all a glimpse into what that fine tuning looks like. I’ll break down my 7 games in the tournament in another post later on.
As I mentioned in my previous post on the fleet: I lost with it...a lot!
But those games were intentional stress tests where I could find the weaknesses in the fleet. I also spent time after each game critically thinking about how the various parts of the fleet had performed. Tuning the fleet was about looking for where I could add things to improve it, what I could afford to lose to be more efficient, and how I could deploy and play to put the pieces I had in the best possible position. We jokingly referred to the fleet as the Mk 14 version of the fleet, but it likely went through more than 14 revisions along the way.
As Biggs recently said on the forums “The pieces together whole must always be more than the sum of their parts." Which was followed by Geek19 saying “THIS THIS THIS THIS THIS FOR ALL LIST BUILDING THIS SO MUCH “
So, thinking about how things work together is a massive force multiplier. As an example, one of the final changes to the fleet was changing to the Slaved Scout Hammerhead from an ExRax Torpedo Hammerhead. That was not a cheap change, but the increase in threat range worked so much better with the rest of the fleet that it was more than worth the cost. That Slaved Scout won me two games doing things that the Torpedo version just couldn’t do.
So, let’s go through the fleet piece by piece and see what each of them bring to the table:

Garm bel Iblis
Space Dad seems so simple. He fills your ship with tokens, goes out for a smoke, and comes back turn 5 to do it again. Previous to this version of the Dumpster Fire I really looked at those tokens as providing flexibility for whatever the situation was at hand. That worked pretty well, but the more I played the fleet, the more I found a plan for each individual token that Garm was handing out and knew what it would be used for before the game began.
- Star Cruiser - The Liberty would start the game with Engineering, Navigation, and Con Fire and fill up with the same on Turn 5. The Engineering token was almost like having another use of a Redirect token. I could be pretty conservative using the Liberty’s sole Redirect knowing I had the Engineering points on hand to shuffle my remaining shields around. When I knew the Liberty was gonna take a pounding I would cue up Repair commands and use the Combined Dial and Token. More than one game I was able to use a combined 12 Engineering points on turns 4 and 5. The Nav tokens were there to feed the Nav Teams. Even on early turn with Nav commands they were occasionally useful. But it was again at key moments when I had a different command cued up that the Nav token/Teams really shined. The Con Fire tokens were strictly a backup to Intensify Firepower!. Even if I didn’t roll a blank I could use the token to fish for a double or accuracy as needed with IF! there to clean up if it went badly.
- Pelta Command - The Pelta would start each game with a Con Fire and a Nav. In most games I would just go ahead and discard the Con Fire to IF! at the start of the game. Then I would use a Con Fire dial to replenish the Con Fire token. This could repeat turn two. Turn 3 I would spend the Con Fire token then use Ashoka to turn the other token into a Con Fire while the Pelta use a Squad Command. It would generally keep up the Squad commands until late game when I might switch to Con Fire as my squadrons died. Turn 5 I would get one more Con Fire token to power up IF! before discarding it on Turn 6. The second Turn 5 token just depended on board state.
- Yavaris - Yavaris would get Squadron and Nav tokens with the Nav token generally being Ashoka’ed into a Squadron token on Turn 4. It could then load back up on the same tokens Turn 5. In this way Garm gave me the effect of having Raymus Antilles on Yavaris without having to pay for him.
- Hammerhead - The Hammerhead got a Nav token at the start of the game and usually the same later on. This token was generally used to control my movement speed while the Hammerhead spammed Con Fire dials.
Overall, by having a thought out plan for those Garm tokens I was able to exclude quite a few points in other upgrades that I would have needed to achieve a similar effect.
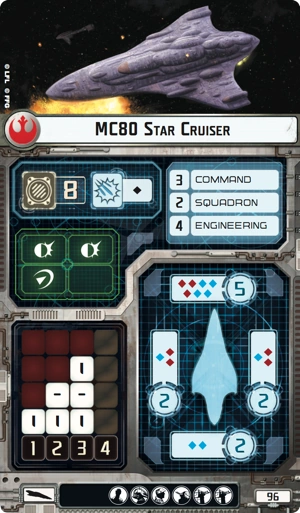
MC-80 Star Cruiser - The flagship of this fleet was a mostly naked Star Cruiser. I got more than a few questions about featuring a large ship with only 2 upgrades. The thing is at 96 points the Star Cruiser is really cheap for a large ship that rolls that many dice. 7 dice out the front at medium range is no joke for fewer than a hundred points. However, the Liberty has serious weaknesses in its maneuver chart and vulnerabilities to squadrons. Those weaknesses can be patched and the firepower improved even further, but in the process of adding upgrades you lose the efficiency of just the basic cost of that front arc.
I strictly deployed the Liberty on my flank and usually pretty far out. This would help keep it safe from getting ganged up on and give me escape routes as needed as well. Threatening a flank helped me set it up for double arcs and also fly it at speed 3 while not racing ahead of the rest of my ships. I would usually try to shoot with it last in a turn as it would put pressure on my opponents to in trying to save defense tokens for the Liberty while getting repeatedly hit by my other ships. It was very much used as my finisher. Even nearly naked it had no trouble killing Quasars in a single activation.
- Strategic Adviser - Early games with the Dumpster Fleet made me really want a 5th activation. I knew it would help me set up traps and overlapping arcs as the 2nd player. I tried working in a flotilla, but in the end looking at Strategic Adviser is what led me to using the Liberty. Strat Adviser got me to activation parity against a couple of fleets in the tournament which also spared me from some unfortunate last/first occurrences. In the end I found Strat Adviser on a Liberty to be a better choice than a Flotilla and an Assault Frigate.
- Nav Teams - It is no secret that my blog-mate, Truthiness, loves an Engine Techs Liberty. The tricks that ship can pull at Speed 4 are just awesome. So, I got a lot of feedback from him, Biggs, and others that I needed to drop the Nav Teams for ETechs as they are just better. In many cases that would be true, but in the case of this fleet I don’t think it was. Tactically, I need all of my ships to attack in concert. ETechs would make it too easy for me to have the Liberty run forward on its own and get killed. But, the Libs nav chart is still awful and Nav Teams fix it in amazing ways. The most important of these is to get an extra click at Speed 1 and pull off the crazy inside turns that are usually only the domain of JJ and Madine. I took Nav Teams because I didn’t need to go faster I needed to turn sharper. In my last game Nav Teams absolutely helped my Liberty double arc an Interdictor in Turn 4. Then in Turn 5 after loading up on tokens I was able to kill the Interdictor, but only escaped ramming my own ships due to Nav Teams. ETechs are still better in most cases, but Nav Teams were a key to this Liberty’s performance throughout the tournament. All for a measly 4 points.
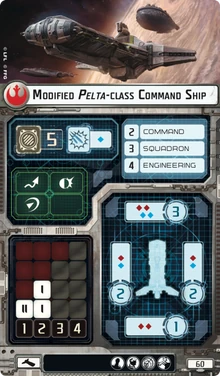
Pelta Class Command Ship - I think pretty much everyone at the event was amused when the only Peltas in the tournament ended up paired up with each other at the top table in Round 2. In fact, the 2 Pelta using fleets finished the tournament in first and second placed. Not bad for the much maligned little ship. The Pelta was in the fleet to allow me to have Intensify Firepower!. But I couldn’t afford to only have it sit back and spam that command. I needed it to do more. Garm tokens + Ahsoka gave me the flexibility to have it trigger IF! while also pushing around squadrons. It also has decent long range firepower, especially when backed up by IF!. So, the Pelta didn’t hide, but pushed forward to add to the overlapping arcs of my other ships.
- Intensify Firepower! - IF! is the reason that this fleet even exists. I wanted to see if I could build an IF! fleet with 4 real ships that also pushed around some squadrons. IF! is a ridiculously efficient way to fix the dice in your fleet. It causes the expected damage floor of your attacks to raise by about a full point. IF! in this fleet is all about pressure. The constant stream of attacks, even with small dice pools, puts so much pressure on opposing ships. IF! means that there are no bad rolls and every attack must be accounted for my your opponent. It also relieves pressure from me as there have been more than one occurrence where just one damage will finish a ship and I don’t have to even think twice about the roll. It was a foregone conclusion.
- Fighter Coordination Team - FCT had three jobs in the fleet. First it helped speed up my squad ball which was ll Speed 3. That extra movement was crucial for getting squads where they needed to be faster. Second, it helps setup Yavaris. FCT would push the squads into engagement so Yavaris could trigger the double taps. Finally, it combo’ed with Strategic on the VCX to make moving tokens around absolutely trivial. I played Intel Sweep 3 times in this tournament and won it easily all 3 times thanks to FCT/Strategic.
- Ahsoka Tano - Garm may as well cost 27 points as I can’t imagine ever playing him without Ahsoka. Her range is amazing and the timing of her activation is super flexible too. As I detailed above Ahsoka allowed me to have a plan for my tokens including when I would change them. Late in the game she helps some with flexibility, but feeding IF! and Yavaris was why she was brought along.
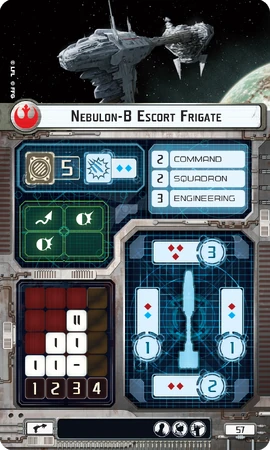
Nebulon-B Escort Frigate - The original Dumpster Fire brought a Neb-B with Salvation as a finisher, but with the Lib in that role Salvation wasn’t needed. What was needed without the Assault Frigate was a second carrier to push squads around. Yavaris was perfect for that. The Neb itself has some reasonable long range firepower, but can get expensive if given too many upgrades. IF! and Garm let me fly the Neb with only the Yavaris title, but still have it boosted both in gunnery and squadron capacity. This kept the Neb cheap, which is important as it is both a high priority target for my opponents and not that hard to kill. Run with only the title I didn’t give up many points when it was frequently killed. The Neb and Pelta ran as a pair straight up the middle. Combined they could throw 7 dice forward and 3 or 4 to the side. Their combined firepower set the Liberty up for several easy kills. I flew the Neb to get as much out of it as I could. Not just Yavaris activations, but frequent long-range double-arc shots too.
- Yavaris - This is one of the most infamous titles in the game and sits besides Demolisher as one of the most ubiquitous. For good reason too as Yavaris is an amazing force multiplier. I didn’t actually get as many double squadron attacks as I might have liked as many of my opponents knew and respected the power of Yavaris. This worked out fine for me as well as I was able to use the threat of that Yavaris activation as an amazing area denial tool as well. When it did get to go off the double activations were brutal, especially when I could sneak Gold Squadron up to a ship.
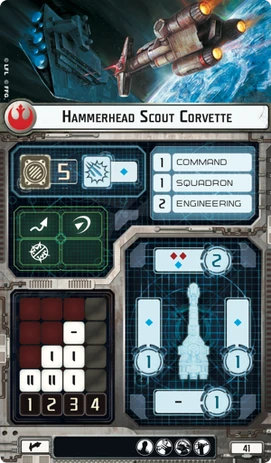
Hammerhead Scout Corvette - As I said above this was the final change to the fleet. I had been running a few different ships in this role. Admonition, Hammerhead Torpedo, and even and even an MC75 had all take a turn as the setup ship in the fleet. The basic goal is to go soften ships up and set them up for the others to finish. They all worked to an extent, but the Scout and its threat range made it all come together. The Scout would be setup on the opposite flank of my Liberty and frequently rush towards the opposing force to provide an early threat. This one me games against fleets in 2 different ways. In one I forced an opponent to deploy his ISD opposite the Hammerhead to protect his Quasar. When my Liberty went down on the opposite flank he was given the choice of taking one of those two ships in the side when he pointed towards the other. He turned towards the Liberty and was repeatedly shot and rammed in the side by the Hammerhead until it eventually succumbed to MMJ. But the damage was done and the ISD dropped without the Lib really needing to shoot it. In another game I used the same tactic and player smartly went hard after the Hammerhead and dropped it fast. I don’t think it fired more than a single flak shot. Here to this worked out for me as it pulled his squads so out of position that the Liberty and Yavaris were able to nuke an Interdictor down from full health without it ever repairing itself.
- Slaved Turrets - This is an okay upgrade, but once again one that fits this particular fleet and ship really well. Given that the Hammerhead is generally free to spam Con Fire commands the Slaved Turrets work to get it up to a 5 dice attack at medium range. The jump up to 5 dice is such a big deal. It gets the attacks up to a reliable 4-5 damage with IF!. That can’t be ignored and really puts pressure on opposing defenses. It was the one upgrade I kept looking at to sneak in Toryn Farr, etc. But that Hammerhead just crossed this damage potential threshold with the Slaved Turrets on there that I knew would be important so I stuck with them. I am very glad that I did.
Squadrons - I really wanted to run my squads in the 65 point range. But repeated thrashings by full squadron fleets proved that was a poor choice. So I went with 92 points. Part fo this was the need to kill squads for points in the tournament. I don’t want to rely on tabling someone at a high end tournament. The skill level is just too high for that to happen reliably. So, I wanted to be able to harvest some of those squadron points. Given that in 6 of my 7 games I played against full squadron fleets I feel like my 92 points did quite well. I can see using this same squad configuration across several fleets.
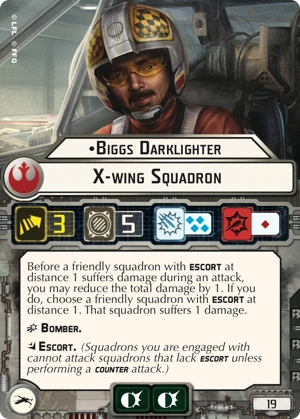
- Jan Ors/Biggs Darklighter/2x X-Wings - I put all these together as they are pretty much a matched set. This group of squads is well known for its ability to tarpit just about anything out there. If I am honest I am not great at the squadron game. I just don’t play a ton of them, so I don’t have the practice. I don’t believe that I really got the potential out of them that I could, but they were still pretty instrumental to my wins. They were an area denial and they soaked attacks. I never killed as many opposing squads as I hoped, but they did a great job of just forcing opposing squads to be wary. They even contributed some anti-ship damage when given the chance, with one exception where a miss from Biggs cost me a chance at winning my only loss.
- Gold Squadron - This may be the most efficient non-ace in the game. Whenever I could sneak it in for a bombing run it did amazing work. A couple of games I had to sacrifice Gold to speed bump opposing squads, but it was always a good trade for me.
- VCX - The VCX served a couple of purposes based on Relay and Strategic. Relay is great to have around with Yavaris and bought me a few extra double taps. Strategic made Intel Sweep the easiest 75 points I have ever scored in an objective. It also allowed me to totally ignore an opposing Targeting Beacons objective. I was also hoping it might counter opposing Strategic based fleets, but as far as I know, that VCX was the only Strategic squadron in the tournament.
Objectives - I played Station Assault, Contested Outpost, and Intel Sweep. I chose those objectives for the same reasons. They score me points fairly easily and they force the fight to be in a specific place. The points are obvious, but doing well in a tournament requires scoring them in buckets and you need your objectives to help. I scored 75 or 80 points to 0 in objectives in every game I was second player. Knowing where the fight would be was very important for the fleet. My plan involved having two of the ships collapsing the flanks. That's harder to do if I don't know where those flanks will be. Each of these objectives forced the opposing fleet to head a specific direction which made it easier for me to get those flank attacks setup.
That’s it. Four ships, seven upgrades, six squadrons only two of which were aces, an unremarkable admiral, and a plan. It seems simple at first but hopefully in reading this you can see that there was a lot of intention and planning put into the fleet. In many ways the fleet is interesting based on all of the things that it doesn’t have. No flotillas, no scatter aces, no defensive retrofits. There were so many dropped upgrades along the way to get it where it is now. The simplicity of the fleet let it shine and allowed me to just cram in more threats than I could have gotten otherwise.
Thanks for reading and please ask questions or tell me what you think in the comments.
Congrats, Schmitty! The one thing I can't emphasize enough is that you've been playing Garm since the inception of Armada. People can netdeck but nobody plays it like you. So for newer players, just become the expert of your list/style and I believe you will have a strong chance of winning a Regional/Prime.
ReplyDeleteThanks Q! Oh yeah, this fleet absolutely fits my personal playstyle perfectly. You gotta find what works for you, and then constantly work to improve it.
DeleteGreat article and congrats on your win. Examples like this really highlight the versatility of Armada and the importance of planning a cohesive force.
ReplyDeleteLow card-count fleets like this are key for some players, like me, who have a maximum number of items on the board they can consistently track during a game. I've had several 15-upgrade fleets where I've forgotten to use half the cards I included, so this is a good example of the importance of taking the right upgrades for your fleet and its mission.
Congrats on the win! Love the potential that this fleet shows in list building! Any commander can work (Yes others are way easier) just need to find the correct ships and upgrades! Theory behind list building is may favorite part! Waiting for RitR shake up! BAD and Asualte Fig. got some big help! Till next time!
ReplyDeleteHow would you play Intel sweep with the list?
ReplyDeleteSet the tokens in a line and use the HH to collect?
Or a different ship / setup.