Ground Command - Star Wars: Legion
Showing posts with label Corellian Conflict. Show all posts
Monday, August 28, 2017
Corellian Conflict: Fleet Roles
I'm badly late on this article. Work has taken a lot out of me of late. Unfortunately that's not likely to change in the near future. But in any case, let's talk briefly about how to approach building fleets as a team in Corellian Conflict. There are three general roles I feel you need to cover to be successful.
Friday, July 21, 2017
Corellian Conflict: Base Assaults
Saturday, July 8, 2017
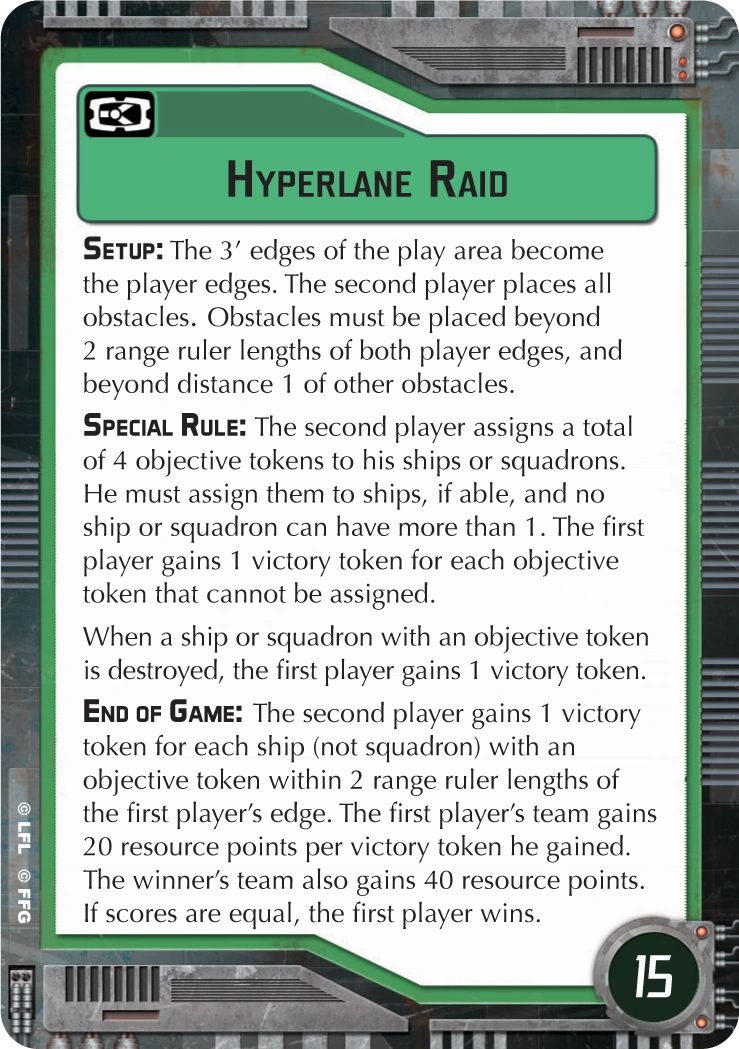
Corellian Conflict: Hyperlane Raid
As promised, my Corellian Conflict focus for July continues with the Rebel Special Assault: Hyperlane Raid.
Wednesday, July 5, 2017
Corellian Conflict: Show of Force
This one is for Yub Nub, who pointed out that we are woefully deficient on our Corellian Conflict guides. It's been a while since we talked Corellian Conflict around here, though not for lack of enthusiasm. I'm of the opinion that this is the absolute best way to play the game, and I don't think Biggs or Shmitty would disagree with that. I think we all got so deep into campaigns that we forgot to talk about them. I'm currently on my third (which I really should do a write up for...). I've played as Empire once and my current campaign is my second as Rebels. I'm going to do my best to go deeper into CC over the next month. I'll start with Yub Nub's requested topic: Show of Force.
Wednesday, February 1, 2017
Corellian Conflict Strategy - Initial Builds (Imperial Part 2)
Labels:
Corellian Conflict,
Imperial Class Star Destroyer,
Imperials,
Interdictor,
List Building,
Star Wars Armada,
Victory Class Star Destroyer
Monday, January 30, 2017
Corellian Conflict Strategy - Initial Builds Rebel (Part 2)
It's time to look at the Rebel ships that you're either unlikely to add - and thus need a firm spot in your list from the beginning - or that if you would add them it would by necessity be when you are in a significant lead in resources. Not something to count on, in other words.
Labels:
Assault Frigate Mark II,
Corellian Conflict,
List Building,
MC30 Frigate,
MC80 Liberty-Class,
MC80 Mon Cal Cruiser,
Star Wars Armada
Friday, January 27, 2017
Corellian Conflict - Pittsburgh Round 2
The Empire is on the defensive! Rebel victories a Raider's Point and Polanis has brought fresh rebel organizations into the fight, while the Imperial's own assault on Selonia Outpost was pushed back. It is a dark time for the Empire, who is committed to turning things around with an offensive onslaught.
![]() |
| State of the sector, start of Turn 2. |
Monday, January 23, 2017
Corellian Conflict Strategy - Initial Builds (Imperials Part 1)
Gonna jump around a slight bit - let's talk about the "small base" Imperial ships for Corellian Conflict initial builds. If you haven't read the background yet for why I suggest building things the way I do maybe you should read up on the Rebels first...
![]() |
| Just a goofy picture from the World Cup. |
Labels:
Arquitens-Class Light Cruiser,
Corellian Conflict,
Gladiator,
gozanti,
Imperials,
List Building,
Raider Class Corvette,
Star Wars Armada
Friday, January 20, 2017
Corellian Conflict Strategy - Initial Builds (Rebel - pt 1)
Let's talk about building ourselves a Rebel fleet, specifically remembering that the first 400 points we start with has a hard limit of 1 upgrade (not counting commander) per ship. What is the best thing to put on each of your ships? What general principles should you use?
Let's take a look.
Labels:
Corellian Conflict,
List Building,
Rebels,
Star Wars Armada,
Strategy
Wednesday, January 18, 2017
Corellian Conflict Strategy - Prioritizing Starting Locations
I've started two rounds of Corellian Conflict now, both times as the Rebels, both times as the Grand Admiral, so needless to say I've been putting a lot of thought into the setup for Corellian Conflict, specifically starting locations as well as good starting lists. We'll be talking about lists later, but I'd like to talk about starting locations now:
Labels:
Corellian Conflict,
Star Wars Armada,
Strategy
Friday, January 13, 2017
Corellian Conflict - The Hyperlane Raid at Raider's Point
The first battle of the Corellian Conflict was a bloody affair, as General Dodonna was committed to bringing resources back to the Alliance, but was not prepared for Darth Vader to be guarding the caravan himself.
Thursday, January 12, 2017
Corellian Conflict Live - Pittsburgh Startup and First Round Matchups
It is a time of chaos in the Corellia system. Corellia itself might be firmly in Imperial hands, but rumors of rebellion popping up throughout the sector has caused significant consternation with Imperial forces.
Here is the story of this fight.
Wednesday, December 28, 2016
Commander's Guide - Corellian Conflict B-Wings
Final Squadrons from Corellian Conflict, and we can dig into the meat of Wave 5!
Dagger Squadron - 15 points
An interesting anti-squadron bump to the traditional B-Wing, where Dagger gets an extra Black in exchange for one of the generic's 3 Blues, and access to the Swarm Keyword. 1 point is a fairly harmless cost over the generic, especially if you're doing Rieekan things. Might combo well in a hybrid role along with a Z-95 swarm.
Ten Numb - 19 points
"While attacking a squadron, you may spend 1 blue dice with a Critical Result Icon. If you do, each other enemy squadron at distance 1 of the defender suffers 1 damage."
Everyone is very excited about this guy, and for good reason. With reroll shenanigans like Toryn Farr, or double tap shenanigans like Adar Tallon or Yavaris, you can chew through enemy fighters like Mauler Mithel normally does for the Imperials. He is slow, and that is his only trick though - no boosted bombing damage for him. Expect to see a lot of him in Combat Air Patrol style fighter configurations.
Labels:
Armada,
B-Wing,
Commander's Guide,
Corellian Conflict
Tuesday, December 27, 2016
Commander's Guide - Corellian Conflict A-Wings
Continuing onward with Corellian Conflict so we can get to the Wave 5 goodness ahead. Just got to talk about the A-Wings and B-Wings! Today it will be the A-Wings.
Labels:
A-Wing,
Armada,
Commander's Guide,
Corellian Conflict
Monday, December 26, 2016
Commander's Guide - Corellian Conflict Y-Wings
Let's get through the rest of the Corellian Conflict so we can get to Wave 5! Y-Wing Time!
Labels:
Armada,
Commander's Guide,
Corellian Conflict,
Y-Wing
Saturday, December 24, 2016
Commander's Guide - Corellian Conflict TIE Advanced
I'm back from the dead to give you more Commander's Guide Series as quickly as I can put them out. Let's get to it then:
Labels:
Commander's Guide,
Corellian Conflict,
TIE Advanced
Wednesday, November 23, 2016
Using New Objectives to Your Advantage - Navigation
Last time we look at the Assault Objectives, and with the Defensive Objectives not fully spoiled, we are forced to move on to the Light Blue objectives everyone enjoys - so without further ado... Navigation!
Monday, November 21, 2016
Using New Objectives To Your Advantage - Assault
Corellian Conflict is looking to give us a host of new objectives to play around with - doubling the number of possibilities from the starter set. How will you be able to make those objectives work for you in your lists, and how do you combat them as First Player? Let's take a look today at the Assault Objectives:
Labels:
Armada,
Assault Objectives,
Corellian Conflict,
Objectives
Monday, October 31, 2016
Commander's Guide - Corellian Conflict Tie Interceptor
Friday, October 28, 2016
Commander's Guide - Corellian Conflict TIE Fighters
Onward to the Empire and their most iconic starfighter, the TIE Fighter. Corellian Conflict brings two new unique squadrons for us to look at:
Subscribe to:
Posts (Atom)