

LEEEERROOOYYY... I mean, hi everybody! We've all been playing with wave 7 for a little while now. I hope you're all enjoying the wave as much as I am. I love the beginning of a new wave. The innovation goes bonkers for a while as we all figure out what works for us and what doesn't. Wave 6 was a pretty mild wave. It gave us a few cool upgrades, but didn't substantially alter the game in a major way. Wave 7, by contrast, is a tsunami. Not only are there are a lot more upgrades to digest, they're also more substantial in the way they impact the game.
So that means it's time for my own experimentation phase of the wave. I'm honed in pretty well on Raddus right now. This isn't necessarily because of his power (though I would out him on a bar well above the two commanders I've tried for the last two Regionals), but more because he helps me use my favorite Star Wars ship of all time: the Liberty. I never got the hang of the thing prior to Raddus. It always seemed too fragile for what I kept trying to do with it. Raddus changes that because he guarantees the positioning Liberty needs even more than most large ships. It's always had high damage potential. It's just been a matter of delivery. It took me a bit, but I think I've settled on my preferred loadout:
MC80 Star Cruiser (96 + 33)
+ Intel Officer (7)
+ Caitken and Shollan (6)
+ SW-7 Ion Batteries (5)
+ XI7 Turbolasers (6)
+ Spinal Armament (9)
Gunnery Teams are all well and good, but I always felt like it was a double edged sword with Liberty, because that meant it was taking return fire from two ships as well. Caitken and Shollan were the ingredient I never knew I was missing. No longer do I have to remove a blue dice with Leading Shots and reduce my damage ceiling. C&S do it for me. The problem was color limitation. I was initially trying to use C&S alongside Heavy Ion Emplacements in an attempt to go for raw damage output. However, that meant I would sometimes have to choose between poor red dice rolls and trying to proc a crit. I switched gears and decided to go for single target punch. I swapped in SW-7s for the Ion slot, which meant C&S could concentrate exclusively on the reds. When I put it all together with the Intel Officer, I had a monster of a ship on my hands. I've had it two-shot a Cymoon from the flank. Engine Techs would be a nice luxury to have, but I've generally found I'm not willing to spend the points in most of my lists.
The rest of the list is where I start to get kinda crazy. Yes, I know I just promised myself to stop doing crazy crap. But come on, did you really expect that to actually happen? The core of the support I've been trying is 3 Flotillas and 6 A-Wings (including Shara and Tycho). I've alternated between a single MC30 and two CR90Bs with Engine Techs for the rest of the fleet. It's that core of Flotillas and A-Wings that have left me a little agonized. They just haven't seemed to be pulling their weight. The A-Wings aren't doing well in the squadron game they're supposed to be bogging down, costing me up to 77 points with little to show in return. It's made me consider going squadronless, which hasn't gone well for me in the past. Squadrons just end up with free reign and kill whatever they like unhindered.
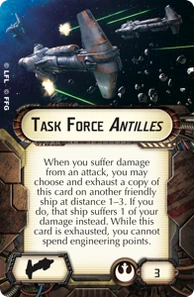
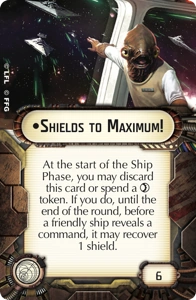
This is where the theoretical part comes in. There is a tool out there that can spread squadron damage across multiple ships, even if the squadrons are attempting to concentrate efforts: Task Force Antilles. It gets better the more Hammerheads you have. I think the critical number would have to be four or more. Anything less than that I don't think would be effective enough. TFA is just one component, though. Spreading damage across a bunch of fairly fragile ships would just delay the inevitable. With all the relay out there, the Flotillas would just scatter to the four winds and continue to have the squadrons whittle down the Hammerheads to nothing. To make this really work, TFA needs to be paired with a much maligned upgrade: Shields to Maximum. With STM all that spread out TFA damage comes right back. In theory, if squadrons target the Hammerheads and they're able to maintain formation, the squadrons would have to inflict 5 damage before anything is even permanent. All the while the Hammerheads are free to navigate or con fire as needed. The weak point could potentially be the Pelta itself, but with a repair command and STM going, the Pelta could recover 3 shields in a turn by itself. That's barely a drop off from the Hammerheads themselves.
Now is this going to survive unscathed against a dedicated bomber force? Absolutely not. The goal is to simply last long enough to bring overwhelming firepower to bear against the primary carriers. The Liberty itself is able to nuke most of the mainstay carriers of today's squadron heavy lists. One shouting a Quasar is not out of the realm of possibility. An AFII is unlikely to last two volleys. Only the ISD is likely to last a while, but it will be hard pressed given the positioning the Liberty is likely to gain thanks to Raddus. Against non-squadron lists, TFA and STM could still work well with the Hammerheads working in pairs. One of the two acts as the trail craft, staying out of range to mitigate things like Gunnery Teams and extending the life of its companion.
So can it work? It's pretty crazy. I guess I'll find out soon. Stay tuned for more reporting from the nut house.
So are you thinking of putting Raddus on the Pelta? This sounds incredibly interesting as I have been trying to learn Sato with a HH swarm but I sure do miss my Liberty.
ReplyDeleteYup, Raddus went on the Pelta. This article was on a timer and I happened to be playing my first game with it when it posted. It did not go well =D
DeleteI'm curious how your game went down.
Delete